
1 cup all-purpose flour (plus some more for the 'play it by ear' part of making batter)
1 cup cornstarch (plus some more for pre-dipping the balls)
2.5 teaspoons baking powder
2.5 teaspoons baking soda
2.5 teaspoons sugar
1 1/3 cups ice cold water
a ton of vegetable oil
Dehydrated soy ball stuff from Lotus Pond (seitan or tofu would probably also work)
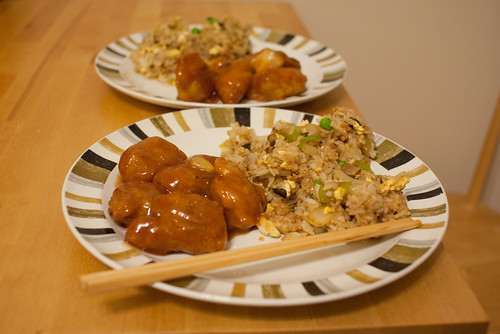
I'm not going to bother posting about the sauce because the one I made the first time wasn't the best and the one I made the second time involved me adding a little of this and a little of that to the point where I wouldn't be able to tell you how to make it. You can also just buy sweet and sour sauce if you're feeling lazy. However, I'll warn you now it's a lot of work and a big mess by the time you're done with the balls so if you're feeling lazy, maybe order in and make these another day.
We ended up making half one day and half the next because I made the mistake of soaking all of the dehydrated inside stuff (yes, that is the technical term.) However this worked out pretty well in our case because we were able to fix our mistakes the next day. I would recommend that you use at most half of the package you buy from Lotus Pond per batch of batter you make up. The bag costs $7.50 and I think probably made about 80 balls but they can be frozen and that's a great way to make it worth the time investment to make these.
Ok, here we go. So...step one: soak your balls. (I am trying not to make too many ball jokes here but c'mon, that one was begging for it.)

The balls should be soaked for at least half an hour in warm'ish water. Once that's done you can get your batter going. So this is the part where I admit that there is more art than science in making these things. If you've ever made pancake batter before it's a similar process of adding more flour until they're working the way you want them to. Typically you'll need more flour than what's listed but just add a bit in at a time until they batter coats the inside filling well and they fluff up nicely in the oil. If you have a deep fryer this will be a lot safer but we used a wok with vegetable oil in it and it worked fine. If you have a thermometer you want the oil somewhere around 140 celcius but the way that worked best for us in figuring out whether the oil was hot enough is just to drop a little batter in it. You'll know it's the right temperature if it floats down to the bottom for just a brief moment and then comes back up. If it sinks and stays down it isn't hot enough yet, if it immediately stays on top and browns your oil is too hot. This is the part where I have to remind you too that water does not put out grease fires and to please have a lid handy in case of emergency. Your soy balls just won't taste as good if you are eating them in the ashes of what used to be your kitchen. (Actually they probably would, they're delicious but I still want you to have a house at the end of this. I'm good like that.)
Alright, so your oils heated, your batter ingredients are mixed. You're ready to make some balls! So here's the trick to get them nice and fluffy. This isn't a dip the ball and let the batter run off of it scenario. We found that the best way to get a nice coating of batter was to scoop the ball up with a lot of batter on a spoon and drop it into the oil with some extra batter. This takes some playing around to get the technique right. The second time we made them we coated them in cornstarch first and that helped but I can't stress enough that if you use a chopstick or something like that you're not going to get that nice fluffy coating of batter. You need to scoop up extra batter each time and make sure a lot of it stays in the oil. This is ideally a two-person job. I was in charge of getting them into the oil, Davis was in charge of getting them out. Other tips? Make sure you don't put too many in at once. This will lower the temperature of your oil and they won't cook right. You'll have to use your best judgement depending on the size of container you're deep frying in but probably 6 at a time is a good starting off point.
Ok, well that's basically it. There's a lot of this recipe that you kind of have to make up as you go along but I did that and it was just fine. Hopefully this will be a good starting off point for you and you'll have balls in your mouth in no time at all! Enjoy.

Bon appetite!
PS At the request of a dear cousin I will be following this post up with an instructional post on how to make delicious fried rice. If I don't have my baby before I get it written. Stay tuned.

I can't wait to buy my own ball sack and get my mouth around some hot balls.
ReplyDelete..Thanks for posting this!
Yay BALLS!!! Thanks so much for posting Kristy!!!
ReplyDeletehey thanks for reading miranda! let me know how they turn out for you!
ReplyDeleteThanks for posting this, Kristy. I will give it a go again!
ReplyDeleteGod I love your tasty balls.
ReplyDeleteI'm going to read the crap outta this blog until you stop updating it and ditch it on the side of the road...
Love you!